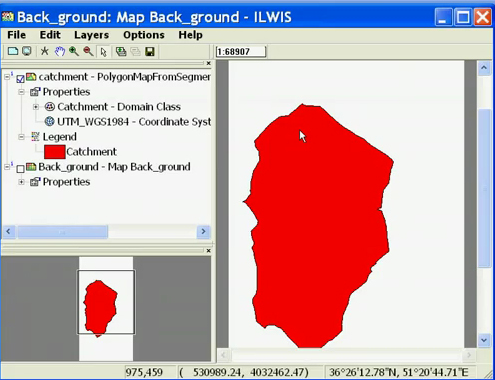
in digitizing a map there is an area or region that we call the polygon area, the following are the steps
1. Open the application ILWIS 3.3 Academic
2. Open the file Back_Ground> OK
3. File> Create> Segment Map ..
4. Fill in the folder name with Cathment_Boundary> OK
5. Do not forget to replace the snap and tunnel tolerance to 0 to move the file click> customize
6. Draw a line with an existing image in the map with the pen tool in the main toolbar there. Lines should be connected from the first point and the last point
7. When finished click the image marks the file> Polygonize ...
8. Fill in the catchment polygon output alone
9. add the domain with the click of a button caara its domain sampig field
10. Fill in the Catchment domain Name> OK
11. close the window and click OK
12. Log in polygon editor window to give domain to the polygon attribute that we created earlier
13. Right click> select New
14. And fill in accordance with the data we get from the map
1. Open the application ILWIS 3.3 Academic
2. Open the file Back_Ground> OK
3. File> create> segment folder ...
4. Fill in your name with River_Total> OK
5. Right click and Open River_TOtal in the main window, you will see a table of River_Total
6. To add a column click Columns> add column
7. Fill in your name with river_code
8. click the button next to the field domain
9. Fill in the name and typenya River_code a Class> Ok
10. Add items by clicking Add Domain domain items and fill in Name 1 and 2> close the window
11. Close window River_Total
12. File> Customize ... > Snap and tunnel tolerance to 0> OK
13. Draw the line of the river with the pen tool in accordance with the existing map
14. double-click to finish drawing and fill in the name and code
15. When finished marking all rivers close the window to exit edit
16. Back_ground go back and add a layer to the Add Data Layer> Total river click> OK
17. Edit> edit layers> seg river_total
18. Do not forget to replace the snap and tunnel tolerance to 0
19. to see the results just press right click on the above river_total then select "Vector Operations"> attibute Map ..
20. fill in the name of the output to show River_code and click> OK
1. Open the application ILWIS 3.3 Academic
2. Open the file Back_Ground
3. Click OK if a warning appears
4. Click File> Create> Segment Map ...
5. Fill in your name with Topo
6. Click the icon next to the domain field to create a new domain
7. Fill in the domain name into Topo, Min, Max becomes 0 and 6000, and the precision becomes 0.0001
8. Click OK and OK again
9. Customize File ...
10. Replace Snap Tunnel tolerance and tolerance to 0> OK
11. Click the icon pen and draw a line with the existing contours on the map
12. In the editing process if we want to move the image so we just press the direction keys on the keyboard
13. To complete the edit, then double click and enter the value to 1600, click exit to exit the edit and do not forget to save the project
1. Open the application ILWIS 3.3 Academic
2. Open Back_Ground projects we have previously made earlier
3. Click OK when a warning
4. Then click File> Create> Point Folder ...
5. Give the name of PICK
6. Change Domain to VALUE
7. Fill Range with 0 and 6000
8. Fill Precision to 0.01
9. Click OK to finish
10. Click the pen icon and then click the appropriate link and enter the coordinates in the raster map
11. When finished marking all the coordinates then click Exit Edit icon located in the main toolbar
12. Close the window and open it again Back_Ground
13. Click OK if a warning appears
14. Add Layer is in the main toolbar or in the Layer> add layer
15. PICK click the file and click OK
16. It would appear the sign we made earlier, if we are going to bring his writings then click Edit> Edit Layer> 2 pnt pick
On this occasion we will make the raster maps that we have input recognizable latitude and longitude coordinates
1. Open the application ILWIS 3.3 Academic
2. Open Back_Ground project we have imported first by double clicking on the file name in the main window or right click open
3. Then click OK when a warning appears
4. Click File> Create> GeoReference ...
5. Choose a coordinate system UTM_WGS1984 and name with WGS_1984
6. click OK
7. Click the icon on the main toolbar Normal
8. Click on the coordinates in the map image which we have previous conversion
9. Enter the XY conversion value that we saved earlier and click OK
10. Mark up all unused conversion
11. After all the results of the conversion included the coordinates will appear automatically when we move the mouse pointer
In the mapping system used is the latitude and longitude, while the digitization of a map into digital data has UTM format. So on this occasion we will do the conversion from latitude and longitude coordinates into UTM coordinates
1. Open the application ILWIS 3.3 Academic
2. Click File> Create> Coordinate System ...
3. Fill in the name of the coordinate system to be converted, for example LatLon_European
4. Tick the CoordSystem LatLon
5. Then click OK
6. Click and select International 1924 ellipsoid
7. Click the Datum and select according to the country you want, such as the European 1950 .. and Iran
8. once finished select OK
9. Create a new coordinate system that will be the result of the conversion
10. click File> Create> System Coordinat ...
11. Fill in the name of the coordinate system and mark UTM_WGS1984 CoordSystem Projection
12. Click and select UTM Projection
13. Click ellipsoid> select WGS 84
14. Detum click and select WGS 1984 and click OK
15. Fill in the zone with the number 39 and click OK
16. Once you have set the coordinate system then we will do the conversion
17. Click Operations> Operation vectorize> Coordinates> Transform Coordinates
18. enter the Coordinate Input and output System with LatLon_European with UTM_WGS1984
19. enter the value of the coordinates will be converted into the Coordinate Input
20. And the results will appear in the output Coordinate
21. Record and save the conversion results into notepad so as not to forget

.jpg "Digitizing Line (Contour Line)")


